Building a Raspberry Pi NAS with Samba
A guide to configuring a Raspberry Pi with Ubuntu as a low-cost NAS using an external USB drive and Samba for file sharing.
Raul G
February 6, 2021
1. Objective: A Personal, Low-Cost File Server
Cloud storage is convenient, but for bulk local file storage and sharing, a personal Network Attached Storage (NAS) device offers greater control, privacy, and speed. This guide provides a technical walkthrough of how to build a cost-effective NAS using a Raspberry Pi and an external USB hard drive.
The goal is to create a centralized file server on a home network that is accessible from other computers, behaving like a standard Windows network share. We will use Samba, the standard Windows interoperability suite of programs for Linux, to achieve this.
This project is ideal for anyone looking to practice Linux system administration and networking fundamentals.
2. Prerequisites
- Hardware:
- A Raspberry Pi (any model with an Ethernet port will work).
- An SD card with Ubuntu Server 20.04 LTS (or a similar Debian-based OS) installed.
- An external USB hard drive.
- Software:
- SSH access to the Raspberry Pi.
- Basic familiarity with the Linux command line.
3. Step 1: Mounting the External Hard Drive
The first step is to make the external storage permanently available to the Raspberry Pi's operating system.
A. Identifying the Drive
After connecting the USB drive, we need to identify its device name. The lsblk (list block devices) command provides a clear overview of all connected storage.
lsblk
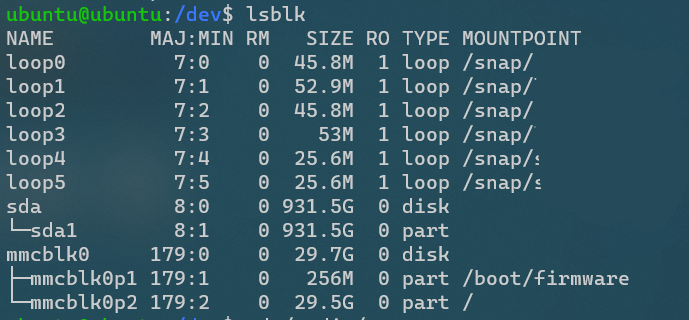 In this example, the 1TB drive is identified as
 /dev/sda, with the primary partition being /dev/sda1.
B. Ensuring a Persistent Mount Point
Mounting the drive directly with sudo mount /dev/sda1 /mnt/external_drive is temporary and will not survive a reboot. To ensure the drive is automatically mounted on startup, we must edit the file system table (/etc/fstab).
Using the device's unique identifier (UUID) is the most reliable way to reference the drive in fstab. First, find the UUID:
ls -l /dev/disk/by-uuid/

Next, create a mount point and grant appropriate permissions:
sudo mkdir /mnt/external_drive
sudo chown -R pi:pi /mnt/external_drive # Or your user/group
Finally, add the following line to the end of /etc/fstab, replacing YOUR_UUID_HERE with the actual UUID of your drive's partition. I formatted my drive to ext4 for native Linux compatibility.
# /etc/fstab
UUID=YOUR_UUID_HERE /mnt/external_drive ext4 defaults,auto,users,rw,nofail 0 0
After saving the file, run sudo mount -a to mount all drives listed in fstab and confirm there are no errors.
4. Step 2: Installing and Configuring Samba
With the storage in place, the next step is to install and configure the Samba server software.
sudo apt update
sudo apt install samba
Samba's configuration is managed in the /etc/samba/smb.conf file. Here, we can define different "shares"—folders that will be accessible over the network.
First, create the directories on the external drive that you wish to share.
mkdir /mnt/external_drive/public
mkdir /mnt/external_drive/private_share
Next, open /etc/samba/smb.conf and add share definitions at the end of the file. Below is an example configuration that creates a public, guest-accessible share and a private, user-restricted share.
# /etc/samba/smb.conf

[Public Share]
path = /mnt/external_drive/public
browsable = yes
writable = yes
guest ok = yes
read only = no

[Private Share]
path = /mnt/external_drive/private_share
valid users = @your_user_group # Or a specific user
browsable = yes
writable = yes
guest ok = no
read only = no
5. Step 3: User Management and Finalization
For private shares, you must create Samba users. These are separate from Linux system users, though they must be linked to an existing system user.
# Add a new system user (if they don't exist)
sudo useradd myuser -m -G users

# Create a Samba password for that user
sudo smbpasswd -a myuser
Finally, restart the Samba services to apply all the configuration changes:
sudo systemctl restart smbd.service
sudo systemctl restart nmbd.service
6. Conclusion
Your Raspberry Pi is now functioning as a NAS. You can access the shares from a Windows machine by navigating to \\<raspberry_pi_ip_address> in the File Explorer, or by using the appropriate SMB client on macOS or other Linux machines.
This project successfully demonstrates how to configure a reliable, low-cost personal file server, providing a practical foundation in Linux storage management and network file sharing protocols.